
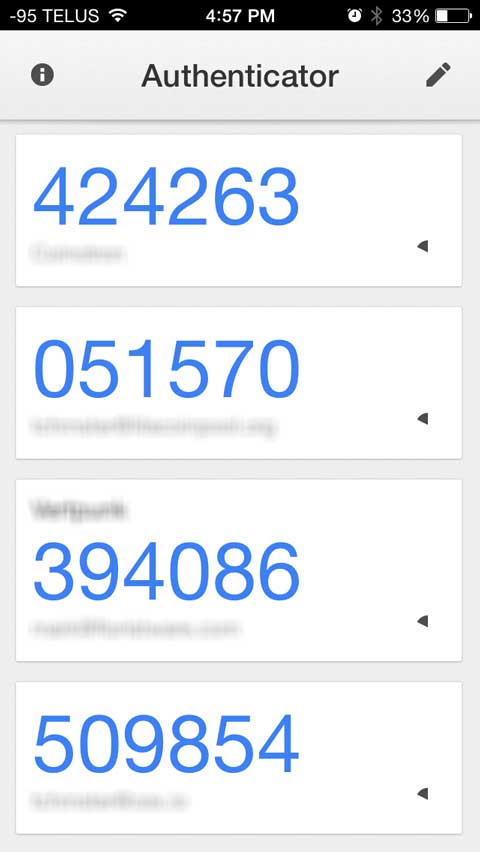
Example of Google Authenticator Being Used To Better Secure Access to a Website
Multi-Factor Authentication With Google Authenticator
Nov 01, 2014
Using Google Authenticator to increase digital security through the use of multi-factor authentication.
Another post looked at how the process of authentication (confirming your identity and associated right to data, funds, etc.) can be made more secure by adding additional "factors". Credit card transactions can for example be made more secure and less susceptible to fraud by adding a knowledge factor (something you know, in this case a PIN) to the existing possession factor (something you have, in this case the credit card itself) to the equation in the new chip+PIN approach.
Google Authenticator is an app you install on your mobile phone that adds a possession factor to many authentication scenarios where previously only a knowledge factor (most commonly a password) was required. Instead of just entering a username and password combination you must also enter a token, in the form of a single use PIN*, securely delivered to the Authenticator app on the mobile device.
*until right now we have always talked about PINs as knowledge factors but above it was referred to as a possession factor... what changed? The difference is that these are single use PINs that are good only for a very limited amount of time, usually thirty seconds. These are not something you know as much as they are something you have for that brief period of time. They are effective random and it is not possible to know them in advance, making them very different from the kind of possession factor PIN you use with your debit card.
At the very least, in single factor authentication situations where the Authenticator app simply replaces a password, a less secure knowledge factor (the password) has been replaced by a much stronger possession factor (the single use PIN) and the process had become much more secure.
And because Authenticator app lives on a mobile phone this allows an additional factor to be introduced. If you use a pin or biometric input (like Apple’s Touch ID) to unlock your phone then you have created a multi-factor process. Simply possessing the phone is not enough, you also need the device PIN/password (knowledge factor) or biometric (inherence or “something you are” factor).
In other implementations of Authenticator you are not replacing the existing password knowledge factor but augmenting it. You must first enter the standard username/password combination, and then enter the single-use PIN. In these situations you have gone from a single factor to something much better:
- Password knowledge factor, something you know
- Token (Single use PIN on the mobile device) possession factor, something you have
- Device Access knowledge factor (PIN) or biometric (Touch ID)
Why Use It?
The added security that comes with multi-factor authentication is widely known but for a long time I resisted it. I already used a pretty good password strategy and, honestly, that seemed like work enough. I was worried that the change would make the many authentications I go through every day more cumbersome.
A few things happened almost simultaneously to change my mind. One was a session I presented with Joe Aldeguar at the 2014 SAN Annual Convention. I wasn’t naive going into it but the research was still an eye-opener and made me serious about looking for a better solution.
Another thing was the celebrity phone hacking scandal. As the dust cleared and it became known in was more about social engineering and just figuring out passwords I was reminded that passwords alone, even in a well managed password strategy, just aren’t enough.
The last thing involved a new hobby. I was starting to mine crypto currencies (Bitcoin and other alt coins) and in that world multi-factor authentication is the standard. I could have opted out but it seemed prudent given that it was definitely the standard.
I started out using it strictly for crypto currencies but it was so easy I quickly started using it wherever it was an option and would encourage others to do the same.
Using Google Authenticator: Initial Setup
The first step is to get the Authenticator app on your device, the same you get any app onto your device depending on the platform. If you use an iOS device that means the iTunes store.
The next step involves the site or service that you want to secure with Authenticator. Log in as you would normally, then look in your account for something like security settings. If the site or service supports Authenticator you should see something like “Two Step Authorization” or “Enable Two-step verification”.
When you find it (and remember, not all sites support Authenticator) click it, and you will be given the direction to complete the setup. Typically a QR code will be shown on the screen. You then open the app on your mobile device, click the “+” (add new) button, and take a picture of the QR code. You also have the option of entering the 26 character string that is contained in the QR code manually.
Using Google Authenticator: Authentication
Once you have authenticator setup it becomes part of your authentication process for that site or service. When you try and sign in you will be required to enter a one time PIN that you will get from the Authenticator app.
You launch the app and see something like this:

The names of the sites are obscured in these images but each gets its own line and unique PIN in the app. You just find the right one and enter it.
Each code is only good for a very limited amount of time. Take a look at the shots below this post. You can see a very small stopwatch icon that indicates how close the codes are to expiring. As they get very close to expiration they turn red and then start to flash.
If you don’t enter the code before it expires you will not be able to authenticate. Fortunately a new set of codes appears instantly and you can try again.
Google Authenticator is a well thought out and very nicely implemented system for enhances security. It is something you should definitely consider for protecting your most important data.


Multi-Factor Authentication With Google Authenticator
Nov 01, 2014
Related Content
How To Migrate Google Authenticator To A New iPhone
Why Have Security Questions After Password Authentication?
How To Securely Hide (and Encrypt) Files On Mac OS X
Security Through Obscurity On Mac OS X – Better Solutions
Showing Hidden Files vs Hiding Regular Files in Mac OS X
What Does Incognito/Private Mode Really Mean?
"Your Apple Device has been locked..." Another Scam
Short Guide to (Finding, Sharing, etc.) SSH Keys on Mac OS X
Open Safari Without Opening Windows From The Last Session
What is Multi-Factor Authentication?
Category List
Tag List
Website Cache – Prime & Load (5)
Technology (1)
Security (33)
SAF (Society of American Florists) (5)
Floral Industry (4)
Best Practices (32)
Floral Management Magazine (14)
Shop Local (12)
Concrete5 (1)
Support Main Street (12)
Two-Factor Authentication (5)
Mac OS X (5)
Toronto (11)
FileMaker (18)
Conventions, Conferences & Trade Shows (4)
Industrial Design (2)
Bitcoin (3)
Deceptive Order Gathering (10)
Flower Buying Tips (23)
Examples of Florist Creativity (6)
Google Authenticator (5)
Litecoin (3)
Multi-Factor Authentication (5)
SugarCRM (3)
Online Marketing For Florists (50)
Website Development (17)
Influence & Persuasion (12)
Graphic Design (4)
FloristWare (10)
Interface Design (7)
Arduino (7)
Mac OS X Server (11)
Digital Security 2014 (10)
Pricing (19)